Thursday, 28 March 2019


Remothered Horror Game # 1 😎 DEEPAK THE TAMIL GAMER
Subscribe My Channel
Fortnite id DEEPAKDKS
Pubg mobile game id deepakdks8124
rules of survival deepakdks
how to download fortnite video link https://youtu.be/Td-0opZ0quk
😎😎😎😎😎😎😎😎😎SUBSCRIBE MY CHANNEL😂😂😂😂😂😂😂😂😂😂
Fortnite id DEEPAKDKS
Pubg mobile game id deepakdks8124
rules of survival deepakdks
how to download fortnite video link https://youtu.be/Td-0opZ0quk
😎😎😎😎😎😎😎😎😎SUBSCRIBE MY CHANNEL😂😂😂😂😂😂😂😂😂😂
AD&D, Super Heroes, And The Death Penalty
After watching an episode from The Flash a few weeks ago, it occurred to me. The traditional super hero comics give one of the best arguments in favor of the death penalty. I am not saying that the death penalty is right or wrong. In fantasy worlds, you are dealing with entities that have super powers rather than typical human abilities. With that said, the storylines of super heroes is such that it provides a compelling reason to for a person to be in favor of it, at least in cases of super powers. To put it another way, perhaps AD&D handles villains better. Let me explain why.
In many of the traditional super hero storylines, you have iconic villains. Those villains will be sent to prison, or locked up in an atom collider. At a certain point in time, those villains escape. They are then recaptured and locked up again. Then, at another point in time, they will escape again. At least some of these villains have killed people. On their release, they will kill people again. The evidence is clear that the regular police have difficultly capturing them. When these criminals are locked up, they will always find a way out. Would it be better for the world if they were killed? In fact, shouldn't the super hero be held morally responsible for not killing the villain? By sparing the life of a villain, who will only escape, he is enabling more death and carnage in the future. I do not see what is so super or heroic about that!
Let us now consider AD&D. I do not know about your adventures, but generally, the group does not take prisoners. You fight and kill the monsters. You try to prevent their escape. Why? Because they will warn other monsters or come to attack you later. Certainly it might be a situation where they surrender, but that is likely rare. Such situations can pose both alignment issues and practical issues. You ae 3 days inside of a dungeon and a group of orcs surrenders. Can you really risk taking them out of the dungeon and turning them over to authorities? Would the authorities even bother locking them up? At the same time, can a good alignment character kill defenseless creatures that surrendered, even if they are evil? The solution I suppose is to always have at least one evil character in your party to deal with the situation.
Now, imagine how messed up your AD&D world would be if your Lawful Good Paladin acted like a super hero! You have battled your way through the fortress. The evil cleric is in the process of summoning an evil demon or god to the world. The entire world could be destroyed or at least enslaved. He is responsible for the deaths of hundreds already. Your party kills all of the guards and defeats the cleric. However, instead of killing the cleric, he is taken prisoner. The prisoner is then taken to a prison. He will later escape from the prison and the party will have to go after him again. It seems to me this will only lead to a world where the evil cleric will eventually win.
Isn't the AD&D of method of simply killing the cleric and then destroying the body to prevent resurrection a much better way to deal with really powerful villains? I know I would certainly feel better living in a world with lawful good paladin slaughtering evil villains than one where every few months another super villain finds his way out to cause harm to the public. In the fantasy worlds, perhaps we should be looking at AD&D instead of super heroes for moral guidance. Or at the very least, a common sense solution to the problem of how to handle super power villains.
Wednesday, 27 March 2019
Mapgen4: Oblique Projection
One of my goals for mapgen4 was to explore non-realistic approaches, both to map generation and to map rendering. I wanted to explain the unusual projection I'm using.
For procedurally generated wilderness maps, it's very common to see a top-down view, often using colors to represent height or biomes:
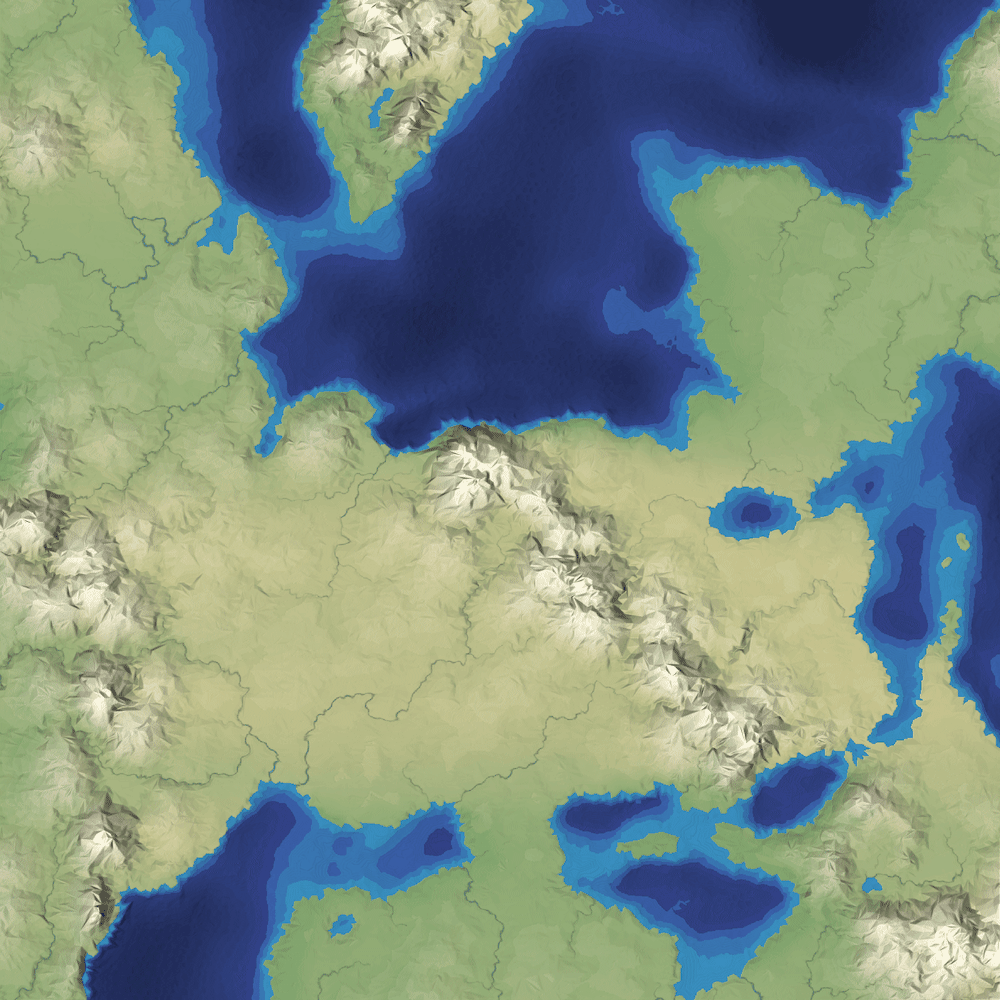
It's simple to implement, especially in 2D, and it shows the areas of the map, including coastlines and rivers and lakes. You can see where the mountains are, but only because of the color and lighting.
It's also common to show a side view, often with perspective:

It's usually implemented in a 3D engine, and it's good for seeing things like mountains, towns, and trees. It's what you'd see in a first person view game. Features like rivers and lakes are distorted and often hidden behind other objects.
Sometimes you want to see both the top-down features (rivers, coastlines, lakes) and the side view features (mountains, towns, trees), and many games use an isometric or orthographic view:
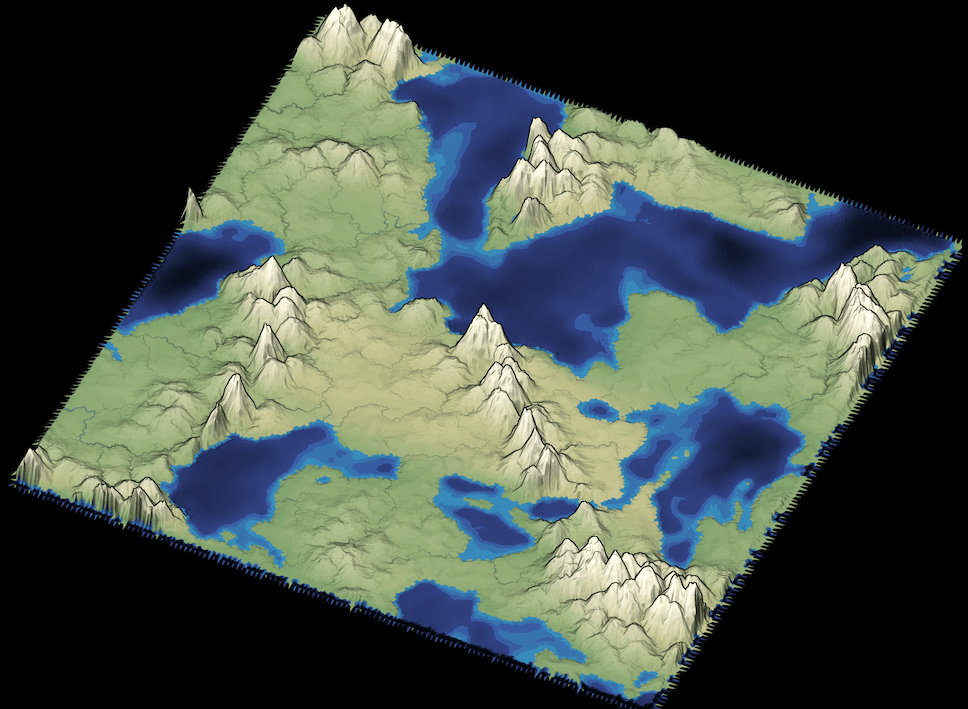
It gives you a bit of both. However, the top-down features are skewed compared to a pure top-down view, and the side view features are also skewed compared to pure side view.
If you look at a hand drawn fantasy map, such as the Lord of the Rings map, or the ones you find on Cartographers' Guild or Reddit r/mapmaking, you'll see artists don't feel constrained to one of the above three views. Instead, very often, they use both top-down view to show rivers and coastlines and side view to show mountains and towns.

The rivers, roads, and coastlines are a top-down view, but the mountains and hills and trees and grasses are a side view. One way to think about this is that the mountains, hills, trees, and grasses are icons like these and therefore don't have to use the same view as the rest of the map. However, it's possible to implement this directly in matrix math. The trick is to use an oblique projection. It's not the standard rotate, translate, scale methods that you get from the matrix libraries in Unity or Unreal, but it can be represented by setting the matrix values directly.
Let's look at the 2D version:
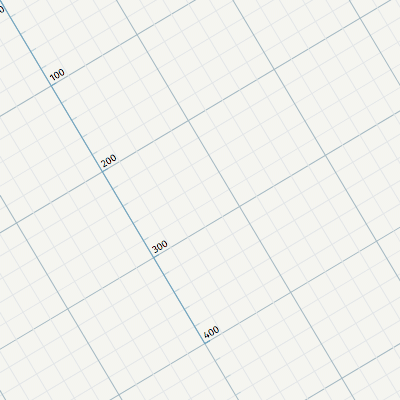
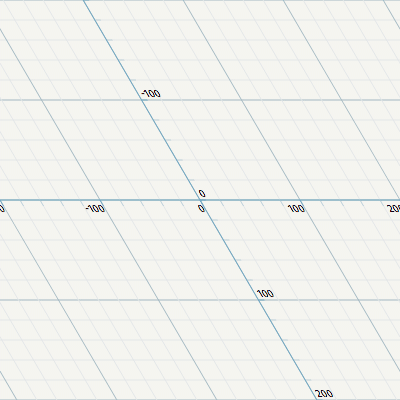
- In a 2D rotation operation, some of x gets transferred to y and some of y gets transferred to x. It preserves the shape of the objects but distorts y and x.
- In a 2D shear operation, none of x gets transferred to y and some of y gets transferred to x. It distorts the shapes and x but preserves y.
To make a hybrid of top-down view's x and y with side view's x and z, we can use a shear operation: preserve x and y, and transfer z to y.
The result is that the top-down view is preserved. When there's no z (mountains or trees), x and y stay exactly the same. But when there's z, it gets mapped to y, so that you can see the side of the mountain. This is entirely implemented in a 4x4 matrix, without using billboard sprites. Here's the result:
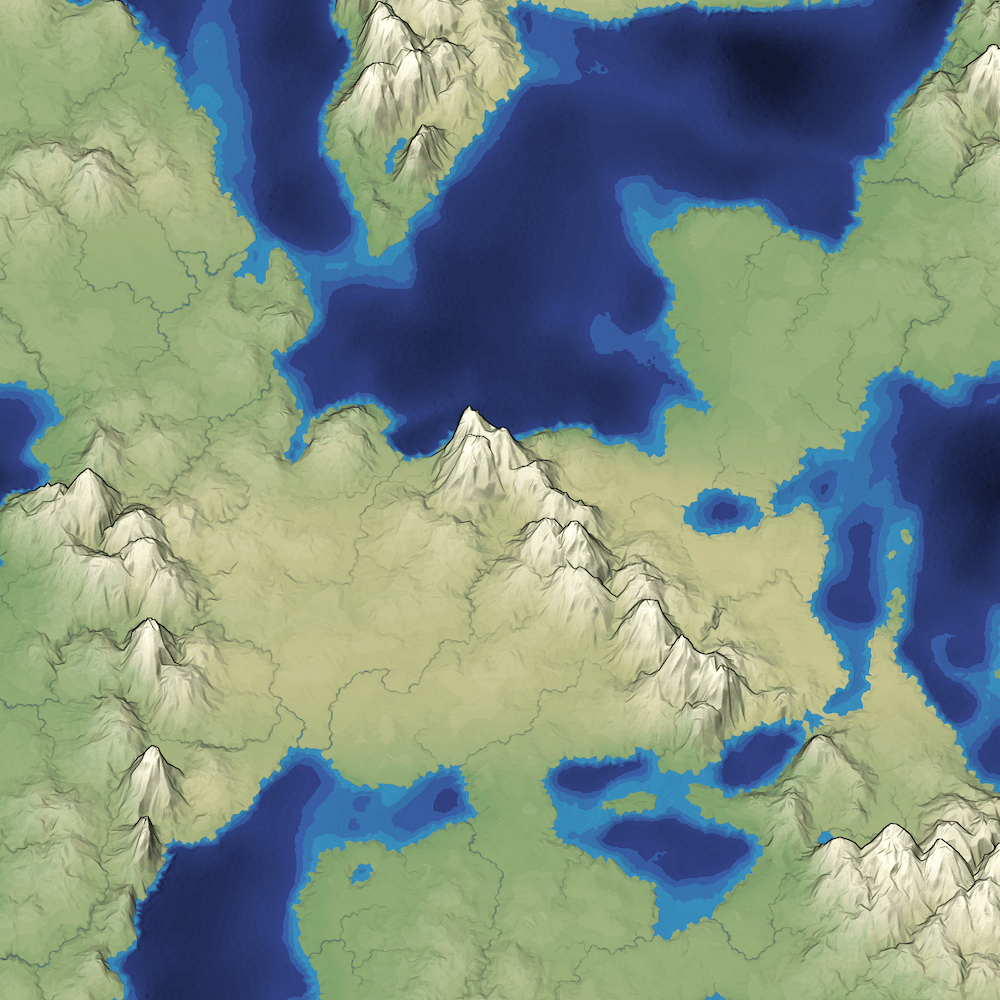
I also have rotation and scaling and translating. I apply them in this order:
- Rotate
- Shear
- Scale
- Translate
I apply shear after rotate so that if the map is rotated, the z axis gets mapped to "up" in the output view. Otherwise, z would get mapped to "up" (y) and then y would get rotated, so the mountains would point sideways instead of up.
I also wanted to support both orthographic and oblique, so I blended the rotate and shear operations together (with one line of code!), so that I can smoothly interpolate between the two projections. I can also smoothly interpolate between top-down view and oblique, or oblique and side view.
I'm pretty happy with the effect!
More reading:
- Wikipedia: oblique projection
- Wikipedia: shear operation
- Isometric, oblique, perspective projections in games
- Plan Oblique in cartography
- Distorting the models instead of the matrix in Zelda: A Link Between Worlds
- Custom projection matrix in Unity, for Verdant Skies
Tuesday, 26 March 2019
Alpha Legion Squad Bravo
My slowly growing 40k army gets some more reinforcements with another regular Chaos Space Marine squad. As I was planning on building roughly a 1800-2000 point army and keep it at that this should be the last regular Core choice, at least for a while before I've played some full sized games. Still a Havoc squad and Terminators to do as well as character models, but outside of that it's mainly just vehicles and Daemon Engines from now on.

As with the previous unit plenty of kitbashing with pieces from different plastic kits from three decades and some 30k Forge World Alpha Legion bits thrown in for flavor. Some minor conversions as well pieces cut off and mixed between kits to vary identical parts somewhat.
Like with the previous unit main colours were done with an airbrush followed by picking out details. I cut down a little on the edge highlights compared to the previous unit as they are just a pain in the **s to do and getting clean edges just seems nigh impossible at times. Concentrated on the most visible areas now to save a bit of time, while still keeping the same look as the other minis. Worked out rather nicely so I'm going to continue with the same on the final minis as well.


I bought some new paints in late spring from a fairly new company from Cyprus called Warcolours. I've been tinkering with them lately, but haven't really painted proper until now. They seem to be more gel like compared to the Vallejo I normally use and dry a lot slower as they are meant more for wet blending etc. compared to traditional layering painting styles. I decided to try them out on the banner to see how easy it would be. Smooth blends are something I've always struggled with, but boy these paints really seemed to make it easy. As they dry slightly slower and are more translucent than Vallejo it was really easy to feather out the edges between layers. In real life the contrast differences are a bit more stark than on the photos, but hopefully they still show the effect. Considering that I did that with 4 different shades in less than 10 minutes the results are pretty nice. With more practice and time really smooth highlights shouldn't be too hard to achieve. I'm really starting to like these paints more and more, the colour selection is aimed more towards fantasy and sci-fi with strong vibrant shades so not that great for historicals, but for other subjects should be amazing. Especially on larger smooth surfaces these are superior to Vallejo and so much easier to handle once you get used to the different properties compared to more traditional paints.
Decal wise I used a combination of Games Workshop and Fallout Hobbies decals as well as a 30k Alpha Legion decal for the unit's Icon. Everything else went on smoothly except for the Forge World one. I've had issues with their decals previously as well as they are extremely thick, but still somehow they seem to be quite brittle and crease easily as well. Getting that hydra decal on the wavy flag took me nearly an hour to get it to sit straight and set into every crease. It seemed that the moment I though I had gotten everything to stick correctly some corner had moved and lifted from the flag. With massive amounts of decal softeners and setters I finally got it to sit straight and covered it with a thick varnish layer that smoothed the surface out to remove most of the creases.


With these guys finished I'm probably going for a Daemon Engine next. I have a Helldrake and a Maulerfiend prepped up so going to start with one of them unless something else grabs my attention. We also have a Flames of War escalation league starting in September so I really need to start to prep and start painting for that as well. I'm going with a Soviet Tankovy so plenty of T-34's in store throughout the autumn.
Read More :- "Alpha Legion Squad Bravo"

As with the previous unit plenty of kitbashing with pieces from different plastic kits from three decades and some 30k Forge World Alpha Legion bits thrown in for flavor. Some minor conversions as well pieces cut off and mixed between kits to vary identical parts somewhat.
Like with the previous unit main colours were done with an airbrush followed by picking out details. I cut down a little on the edge highlights compared to the previous unit as they are just a pain in the **s to do and getting clean edges just seems nigh impossible at times. Concentrated on the most visible areas now to save a bit of time, while still keeping the same look as the other minis. Worked out rather nicely so I'm going to continue with the same on the final minis as well.


I bought some new paints in late spring from a fairly new company from Cyprus called Warcolours. I've been tinkering with them lately, but haven't really painted proper until now. They seem to be more gel like compared to the Vallejo I normally use and dry a lot slower as they are meant more for wet blending etc. compared to traditional layering painting styles. I decided to try them out on the banner to see how easy it would be. Smooth blends are something I've always struggled with, but boy these paints really seemed to make it easy. As they dry slightly slower and are more translucent than Vallejo it was really easy to feather out the edges between layers. In real life the contrast differences are a bit more stark than on the photos, but hopefully they still show the effect. Considering that I did that with 4 different shades in less than 10 minutes the results are pretty nice. With more practice and time really smooth highlights shouldn't be too hard to achieve. I'm really starting to like these paints more and more, the colour selection is aimed more towards fantasy and sci-fi with strong vibrant shades so not that great for historicals, but for other subjects should be amazing. Especially on larger smooth surfaces these are superior to Vallejo and so much easier to handle once you get used to the different properties compared to more traditional paints.
Decal wise I used a combination of Games Workshop and Fallout Hobbies decals as well as a 30k Alpha Legion decal for the unit's Icon. Everything else went on smoothly except for the Forge World one. I've had issues with their decals previously as well as they are extremely thick, but still somehow they seem to be quite brittle and crease easily as well. Getting that hydra decal on the wavy flag took me nearly an hour to get it to sit straight and set into every crease. It seemed that the moment I though I had gotten everything to stick correctly some corner had moved and lifted from the flag. With massive amounts of decal softeners and setters I finally got it to sit straight and covered it with a thick varnish layer that smoothed the surface out to remove most of the creases.


With these guys finished I'm probably going for a Daemon Engine next. I have a Helldrake and a Maulerfiend prepped up so going to start with one of them unless something else grabs my attention. We also have a Flames of War escalation league starting in September so I really need to start to prep and start painting for that as well. I'm going with a Soviet Tankovy so plenty of T-34's in store throughout the autumn.
(218 MB) GTA Vice City Download For Free
(218 MB) GTA Vice City Download For Free

Screenshot


System Requirements of GTA Vice City Free Download
- Tested on Windows 7 64-Bit
- Operating System: Windows Vista/7/8/8.1/10
- CPU: 800 MHz Intel Pentium III or 800 MHz AMD Athlon or 1.2GHz Intel Celeron or 1.2 GHz AMD Duron processor
- RAM: 512MB
- Setup Size:218 MB
- Hard Disk Space:450 MB

Sleeping Dog Limtited Edtion Free Download
Sleeping Dog Limited Edition Download
Screenshots
 |
Player can do many things such as running swiming and jumping.Player has got variety of weapons and he can use them in many situation.Player can use martial arts to fight with enemies.
 |
Sleeping Dog Limited Edition Features
Open world action, adventure video game
No strict rules
Single player game
Player can do many things
Variety of weapons
Many girl for dating
Upgrade and cusomisze his clothes and cars

Sleeping dog minimum system requriment
Operating system:win.7,8,.8.1
CPU: Core 2 Duo
RAM: 4 GB
Hard Disk: 15 GB
Sleeping Dog Limited Edition Free Download
Part:1: http://velociterium.com/6nv1
Part:2:http://velociterium.com/6nxH
Part:3: http://velociterium.com/6o04
Part:4: http://velociterium.com/6o1f
Part:5: http://velociterium.com/6o4N
Part:6: http://velociterium.com/6o8T
Part:7: http://velociterium.com/6oAf
Part:8: http://velociterium.com/6oEI
Part:9: http://velociterium.com/6oFz
Part:10: HTTP://VELOCITERIUM.COM/6OJM
Thanks for download the game
Popular for GTA 5 Money
Glitcheshttps://youtu.be/SlZvVwnUxeQ
Subscribe to:
Posts (Atom)